Update Intravue
WBC Network Health Monitor uses the IntraVUE API and the ivDashboard web application to collect data from IntraVUE.
The first update of the ivDashboard.war file must be done manually. After that WBC Network Health Monitor will automatically update this file when needed.
There are 2 methods of getting the ivDashboard web application installed in Tomcat.
1) The easiest way in Windows is to simply copy the file, like c:\wbcNetworkHealthMonitor\dist\ivDashboard.war to the IntraVUE webapps folder, located by default at c:\intravue\autoip\tomcat8\webapps.
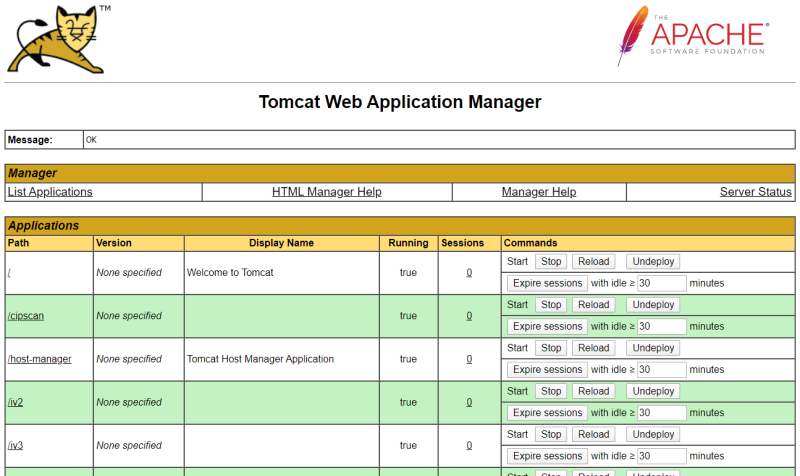
The ivDashboard.war file is deployed through the Apache Tomcat Manager's web page. On a local machine the url is http://127.0.0.1:8765/manager/html. The login user and password is the same as you use for IntraVUE For remote Intravue's substitute the ip address of that Intravue.
Open a browser and go to the manager page.
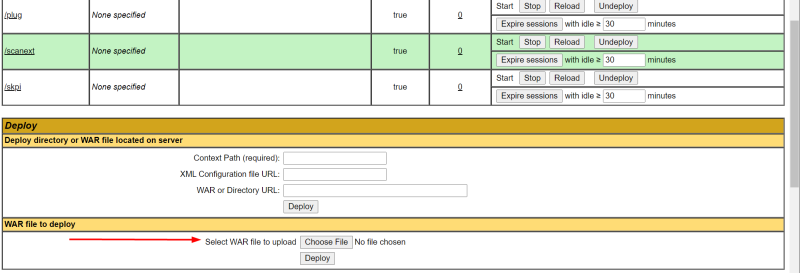
At the bottom of the page is the deploy section. Click on 'Choose File' and navigate to the 'dist' folder of WBC Network Health Monitor. Select the ivDashboard.war file. Note, if you are updating the ivDashboard.war file you must first use the Undeploy button where ivDashboard is listed above.
On older versions of IntraVUE you can follow the steps for a local Windows machine, except substitute 127.0.0.1 for the remote IP.
Newer versions of IntraVUE have applied security to prevent the Apache Manager from being accessed remotely. Contact WBC-INS tech support for help changing this.
For newer IntraVUE versions, you choices are:
- You can use Remote Desktop or a similar application to copy ..\wbcNetworkHealthMonitor\dist\ivDashboard.war to the remote Intravue and follow the steps for a local machine above.
- You can use Remote Desktop or a similar application to copy ..\wbcNetworkHealthMonitor\dist\ivDashboard.war to the remote Intravue and then move the file to ...\intravue\autoip\tomcat8\webapps. Tomcat will then self deploy ivDashboard. (You can overwrite any previous version)
All IntraVUE Edges prevent access to the Apache Manager application. The following upload process is only required one time, during the installation. After that the required ivDashboard.war file will be automatically updated as required.
Required Tools
-
Use Windows SSH or Putty.exe - a command line tool.
Putty is available at http://127.0.0.1:8765/tools/putty/putty.exe -
winscp.exe - a Windows user interface tool to copy files
Available at http://127.0.0.1:8765/tools/winscp/winscp517setup.exe
Process Overview
- Start Putty or SSH and log into the IntraVUE Edge appliance.
- Execute a script that allows root login
- Start WinScp, log into the IntraVUE Edge appliance.
- Navigate to the web servers webapp folder on the appliance and the \\wbcNetworkHealthMonitor\\dist folder on Windows
- Copy the ivDashboard.war file from Windows to the Edge
- Change permissions on war file
- Close WinScp
- Go back to Putty and execute a script that denies root login. Exit.
Detailed Steps
Start SSH or Putty, enter the IP Address of the Edge and Open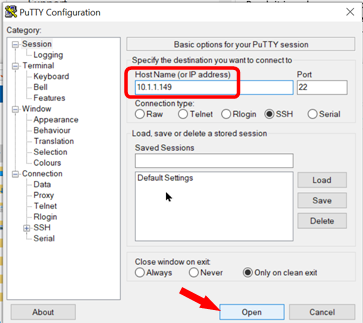
Login using user intravue, password intravue
Become the superuser, enter "su -" and enter the root password
enter "cd /root"
enter "sh allowrootlogin.sh"
prompt will change for $ to #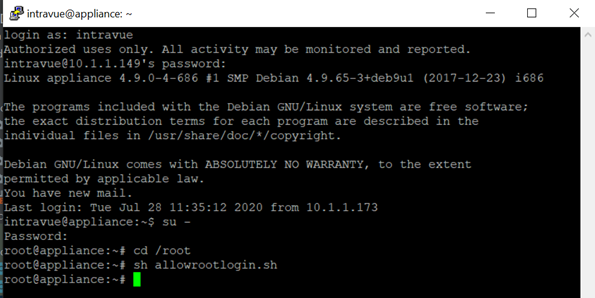
Start WinScp, enter the IP Address of the Edge, root for user and the root password. Login. 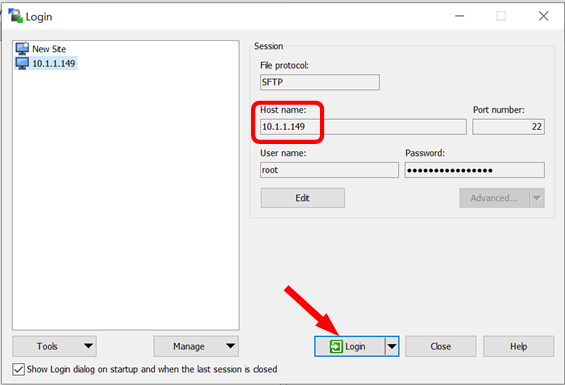
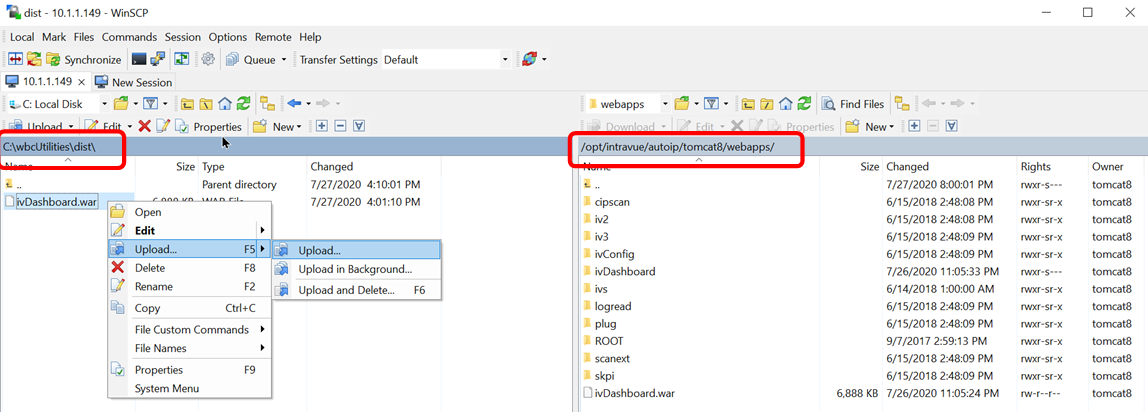
- Navigate to /opt/intravue/autoip/tomcat8/webapps on the right
-
Navigate to \wbcNetworkHealthMonitor\dist on the left
- If ivDashboard was previously installed you will see the file and a directory already there, delete the .war file. If you refresh the ivDashboard folder will also have been removed.
-
Right click on ivDashboard.war and Upload
- Right click on ivDashboard.war on the right, select Properties, change the Owner from "root" to "tomcat8"

NOTE: DO NOT FORGET TO CHANGE Properties. This enables automatic updates of the ivDashboard.war file when updates are available, making this a one time only process
- After a moment you should see a new folder named ivDashboard appear, if not do a refresh.
Finishing
Close WinScp
Go back to Putty
Enter "sh denyrootlogin.sh"
Enter "logout" to exit superuser mode
Enter "logout" to close Putty
Done.
NOTE: The admin should not have to do this, the automatic updating should take care of this. These steps are included in case of an issue.
Process Overview
- Start Putty or SSH and log into the IntraVUE Edge appliance.
- Execute a script that allows root login
- Start WinScp, log into the IntraVUE Edge appliance.
- Navigate to the web servers webapp folder on the appliance and the \\wbcNetworkHealthMonitor\\dist folder on Windows
- Change user properties on war file from root to tomcat8
- Close WinScp
- Go back to Putty and execute a script that denies root login. Exit.
Detailed Steps
Start SSH or Putty, enter the IP Address of the Edge and Open
Login using user intravue, password intravue
Become the superuser, enter "su -" and enter the root password
enter "cd /root"
enter "sh allowrootlogin.sh"
prompt will change for $ to #
Start WinScp, enter the IP Address of the Edge, root for user and the root password. Login.
- Navigate to /opt/intravue/autoip/tomcat8/webapps on the right
- Right click on ivDashboard.war on the right, select Properties, change the Owner from "root" to "tomcat8"
- After a moment you should see a date of the folder named ivDashboard be the same as the date of the ivDashboard.war file.
Finishing
Close WinScp
Go back to Putty
Enter "sh denyrootlogin.sh"
Enter "logout" to exit superuser mode
Enter "logout" to close Putty
Done.
